@OneToOne Mapping: Uni-Directional

One-to-One mapping 중 Uni-Directional 의 경우, 위와 같이 구조를 그릴 수 있다. 종속된 entity 의 PK 를 상위 entity 가 FK 로 사용하는 것이다.
그렇다면 SQL 에서는 어떻게 FK 를 지정해야 하는 것일까?
Defining Foreign Key
CREATE TABLE `instructor` (
	...
	CONSTRAINT `FK_DETAIL` FOREIGN KEY(`instructor_detail_id)
	REFERENCES `instructor_detail` (`id`)
);
CONSTRAINT FK_DETAIL 은 제약 조건의 이름을 나타내는 것이다. 여기서 FK_DETAIL 이라는 이름의 제약 조건은, instructor table 의 instructor_detail_id column 이, instructor_detail table 의 id column 을 참조하도록 강제하는 외래 키 제약 조건(Foreign Key Constraint) 이다.
More on Foreign Key
FK 를 사용함에 있어서 가장 주요한 목적은 Referential Integrity 이다. Referential Integrity 는 Database 에서 FK 가 가리키는 값이 실제로 존재해야 한다는 규칙이다.
또한 entity 간의 관계를 destroy 할 수 있는 method 및 operation 등에 대하여 보호할 수 있으며, 위에서 언급한대로 FK 가 항상 valid 한 reference 를 갖고 있다고 보장할 수 있게 된다.
@OneToOne - Cascade Types
| Cascade Types | Description |
|---|---|
| PERSIST | entity 가 persisted/saved 라면, related entity 도 함께 persisted |
| REMOVE | entity 가 removed/deleted 라면, realted entity 도 함께 deleted |
| REFRESH | entity 가 refreshed 되면, related entity 도 함께 refreshed |
| DETACH | entity 가 detached 되면, related entity 도 함께 detached |
| MERGE | entity 가 merged 되면, realted entity 도 함께 merged |
| ALL | 상위의 모든 cascade types |
위는 Uni-Directional 의 One-to-One mapping 에서 cascade types 를 정리한 표이다. default 로는 아무 cascade option 도 실행되지 않는다.
Configure Multiple Cascade Types
@OneToOne(casecade={CasecadeType.DETACH,
					CasecadeType.MERGE,
					CasecadeType.PERSIST,
					CasecadeType.REFRESH,
					CasecadeType.REMOVE,})
Development Process
Uni-Directional 의 One-to-One mapping 에 대한 development process 는 다음과 같다.
- Prep Work - Define database tables
- Create InstructorDetail class
- Create Instrcutor class
- Create Main App
Step 1: Prep Work - Define database tables
먼저 DB table 부터 정의하자.
DROP SCHEMA IF EXISTS `hb-01-one-to-one-uni`;
CREATE SCHEMA `hb-01-one-to-one-uni`;
USE `hb-01-one-to-one-uni`;

SET FOREIGN_KEY_CHECKS = 0;
우선 schema 를 정의하자. 위와 같이 기존에 존재하는지 검사하고, 새로 생성한 뒤 해당 schema 를 사용한다.
마지막 줄에 존재하는 SET FOREIGN_KEY_CHECKS = 0; 는 외래 키 검사, 자세하게는 참조 무결성 검사를 비활성화한다는 명령이다. 당연하게도 활성화는 = 1 로 설정하면 된다. 해당 검사는 왜 쓰는 걸까?
Referentail Integrity, 즉 참조 무결성 검사는 부모 table 과 자식 table 의 참조 관계에 대한 무결성을 검사하는 것이다. 참조 무결성이 설정되어 있는 경우, 부모 table 을 삭제할 때나 자식 table 에 데이터를 넣을 때 제약이 발생한다.
마치 C/C++ 에서 Dangling Pointer Problem 과 비슷한 상황을 검사하는 것이라고도 볼 수 있을 것 같다.
해당 설정은 처음 schema 의 table 들을 define 할 때만 사용하는 것이 좋고, 실제로 테스트 단계나 운영 단계에서는 다시 활성하는 것이 바람직하다.
그리고 자식 table 에 해당하는 instructor_detail table 을 define 하자.
CREATE TABLE `instructor_detail` (
  `id` int NOT NULL AUTO_INCREMENT,
  `youtube_channel` varchar(128) DEFAULT NULL,
  `hobby` varchar(45) DEFAULT NULL,
  PRIMARY KEY (`id`)
) ENGINE=InnoDB AUTO_INCREMENT=1 DEFAULT CHARSET=latin1;
primary key 는 id 로 설정하고 그 이외에는 특별히 설정해줄 것은 없다. 이제 부모 table 에 해당하는 instuctor table 을 define 하자.
CREATE TABLE `instructor` (
  `id` int NOT NULL AUTO_INCREMENT,
  `first_name` varchar(45) DEFAULT NULL,
  `last_name` varchar(45) DEFAULT NULL,
  `email` varchar(45) DEFAULT NULL,
  `instructor_detail_id` int DEFAULT NULL,
  PRIMARY KEY (`id`),
  KEY `FK_DETAIL_idx` (`instructor_detail_id`),
  CONSTRAINT `FK_DETAIL` FOREIGN KEY (`instructor_detail_id`) REFERENCES `instructor_detail` (`id`) ON DELETE NO ACTION ON UPDATE NO ACTION
) ENGINE=InnoDB AUTO_INCREMENT=1 DEFAULT CHARSET=latin1;
foreign key 로 사용할 instructor_detail_id column 을 define 하고, id 를 primary key 로 설정한다.
그리고, instructor_detail_id column 에 대하여 FK_DETAIL_idx 라는 이름의 index 를 생성한다. index 는 검색 속도를 향상시키는 장점이 존재한다. 하지만 해당 부분을 explicit 하게 작성하지 않아도 MySQL 은 자동으로 숨겨진 index 를 생성하지만, index 에 대한 이름은 사용자가 지정할 수 없고 내부적으로 instructor_ibfk_1 등의 이름으로 저장된다.
그 다음 FK_DETAIL 이라는 이름으로 제약 조건을 설정하는데, 두 table 간의 관계를 강제로 연결해준다. instructor_detail_id column 을 FK 로 사용하고, instructor_detail table 의 id column 을 참조하도록 한다. 마지막으로, 부모 table 에서 해당 데이터를 삭제할 수 없고, 값을 변경할 수 없게 설정한다.
SET FOREIGN_KEY_CHECKS = 1;마지막으로 Referentail Integrity 를 다시 활성화시킨다.
이후 MySQL Workbench 에서 [Database] > [Reverse Engineer] 메뉴를 통하여 Diagram 설정을 한 뒤에 다음과 같이 Cardinality 를 One-to-One 으로 바꾸어주면 된다.
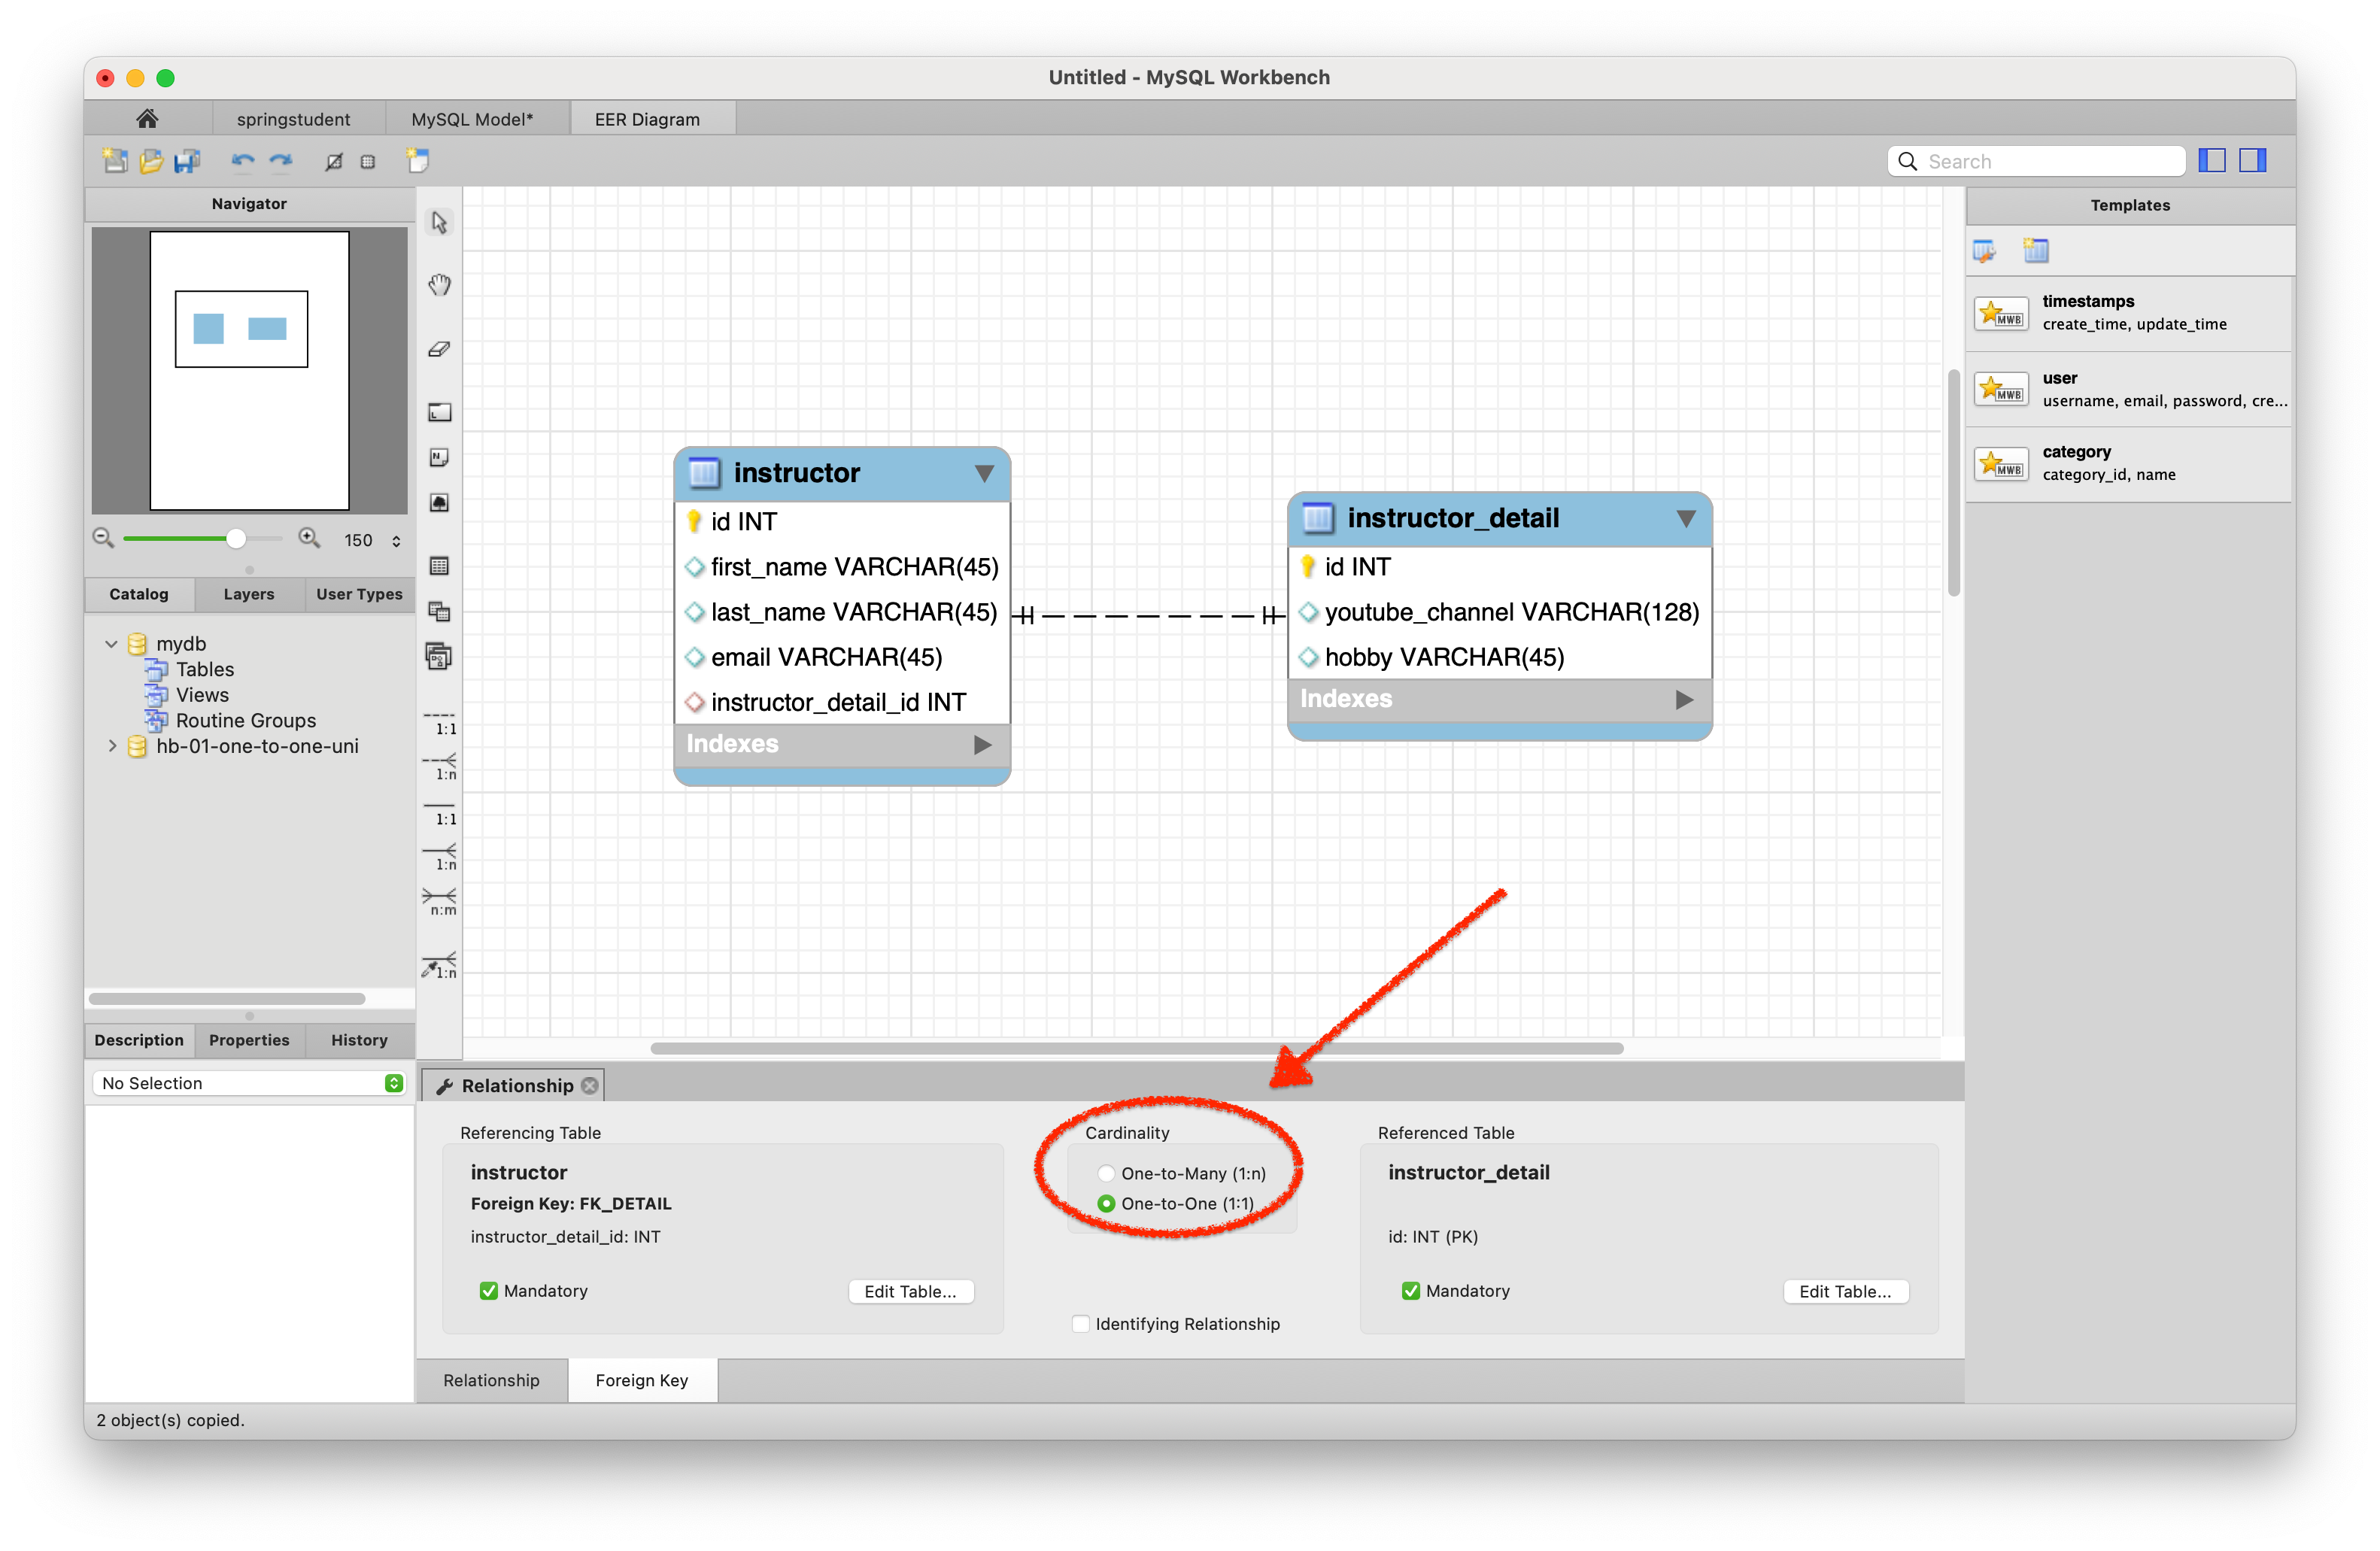 위 diagram 을 보고 알 수 있듯이,
 instructor_detail table 의 PK 로 사용되는 id column 은 instructor table 의 FK 에 의하여 참조되므로, instructor_detail table 은 parent table 로, instructor table 은 child table 로 분류할 수 있다.
마치 class 의 상속과 같은 개념처럼, 참조되는 쪽이 parent 이고 참조하는 쪽이 child 이다.
Step 2: Create InstructorDetail class
@Entity
@Table(name="instructor_detail")
public class InstructorDetail {
    // define the fields ...
    // define constructors ...
    ...
}
instructor_detail table 에서 설정한 column 대로 알맞게 InstructorDetail entity class 를 define 해준다.
Step 3: Create Instrcutor class
@Entity
@Table(name = "instructor")
public class Instructor {
    // define fields ...
    // set up mapping to InstructorDetail entity
    @OneToOne(cascade = CascadeType.ALL)
    @JoinColumn(name = "instructor_detail_id")
    private InstructorDetail instructorDetail;
	...
}
Uni-Directional One-to-One mapping 이므로 child table 쪽에서만 mapping 관계를 define 해주면 된다.
그 방법은 위와 같이 @OneToOne annotation 을 통하여 cascade option 과 함께 define 하면 되고, @JoinColumn annotation 을 통하여 FK 로 사용할 column 이름을 지정한다. 해당 column 으로 두 개의 table 이 연결되는 것이다.
Step 4: Create Main App
Main App 을 생성하기 전에 Entity 접근을 대신할 DAO 를 먼저 define 하는 것이 더 나을 것 같다.
public interface AppDAO {
    void save(Instructor instructor);
}@Repository
public class AppDAOImpl implements AppDAO {
// define field for entity manager
private EntityManager entityManager;
// inject entity manager using constructor injection
public AppDAOImpl(EntityManager entityManager) {
this.entityManager = entityManager;
}
@Override
@Transactional public void save(Instructor instructor) {
entityManager.persist(instructor);
}
}DAO 에 대한 interface 와, 그에 대한 implementation 을 위와 같이 define 해준다. implementation class 에서는, 여기서 알 수 있듯이, @Repository annotation 을 통하여 해당 class 에 대한 object 가 Spring Bean 으로 자동 등록될 수 있도록 한다.
이제 Main App 으로 넘어가서 실제 데이터를 사용하여 test 해보자.
@SpringBootApplication
public class CruddemoApplication {

    public static void main(String[] args) {
       SpringApplication.run(CruddemoApplication.class, args);
    }

    @Bean
    public CommandLineRunner commandLineRunner(AppDAO appDAO) {
       return runner -> {
          createInstructor(appDAO);
       };
    }

    private void createInstructor(AppDAO appDAO) {
       // create the instructor
       // create the instructor detail
       // associate the objects
       tempInstructor.setInstructorDetail(tempInstructorDetail);

       // save the instructor
       appDAO.save(tempInstructor);
       ...
    }
}
위와 같이 CommandLineRunner 를 통하여 Application 이 실행된 직후에 실행할 code 를 설정할 수 있다. createInstructor() method 를 위와 같은 순서로 define 한 뒤에 해당 method 를 실행하는 식으로 구성하면 된다.
Application 을 실행하기 이전에 application.properties 를 통하여 Hibernate 의 logging 기능을 사용하자.
logging.level.org.hibernate.SQL=trace
logging.level.org.hibernate.orm.jdbc.bind=trace
위와 같이 설정함으로써 실제 DB 에서 사용되는 SQL query 와 해당 query 에 사용되는 실제 data 들이 어떤 것인지를 logging 할 수 있다.
이제 Application 을 실행해보자.
One-to-One Mapping Uni-Direction - Test (save)
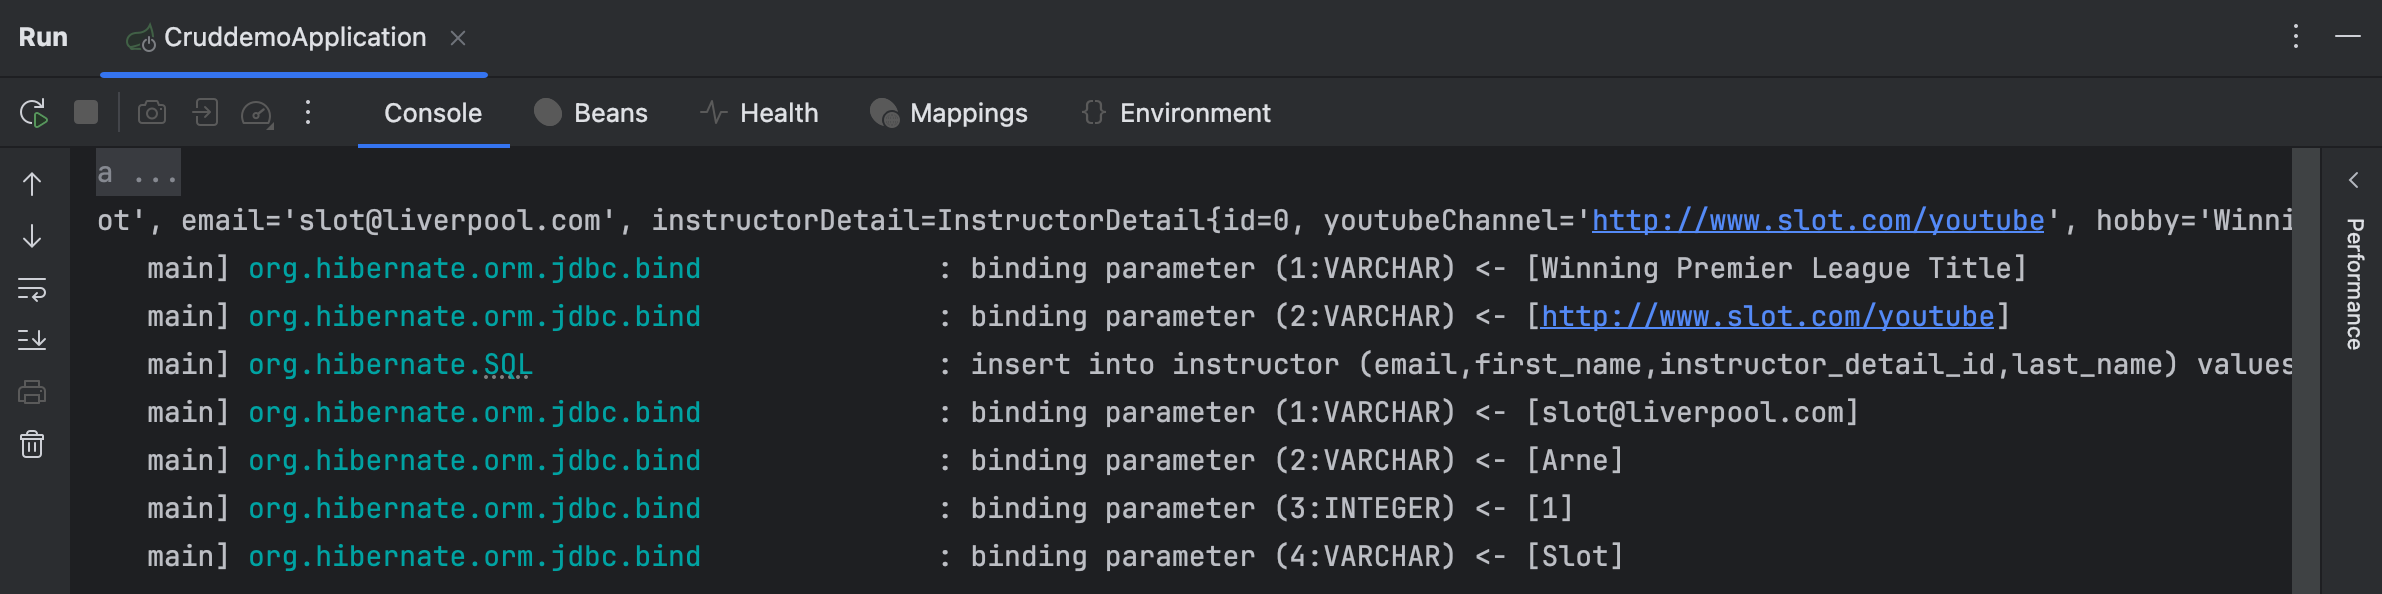
console 에 출려된 log 에서 볼 수 있듯이, 설정해준 properties 에 의하여 출력된 SQL query 와 이에 binding 된 value 들을 확인할 수 있다.


결과적으로 실제 DB table 에도 data 들이 잘 쌓인 것을 볼 수 있다. Main App 에서 단순히 Instructor object 만 저장했는데도 InstructorDetail object 가 같이 저장된 것을 볼 수 있다.
One-to-One Mapping Uni-Direction - Test (find)
이제 저장된 data 를 기반으로, instuctor 를 조회하고 이를 통하여 instructor detail 까지도 조회할 수 있는지 test 해보자.
우선 AppDAO interface 에 findInstructorById 를 추가하고 아래와 같이 AppDAOImpl 에서 overriding 하자.
@Override
public Instructor findInstructorById(int theId) {
    return entityManager.find(Instructor.class, theId);
}
그리고 Main App 에서는 아래와 같이 findInstructor method 를 추가하여 test 를 진행하자.
private void findInstructor(AppDAO appDAO) {
    int theId = 1;
    System.out.println("Finding instructor id: " + theId);

    Instructor tempInstructor = appDAO.findInstructorById(theId);

    System.out.println("tempInstructor: " + tempInstructor);
    System.out.println("the associate instructorDetail only: " + tempInstructor.getInstructorDetail());
}
이제 Application 을 실행하여 console log 를 확인해보면,
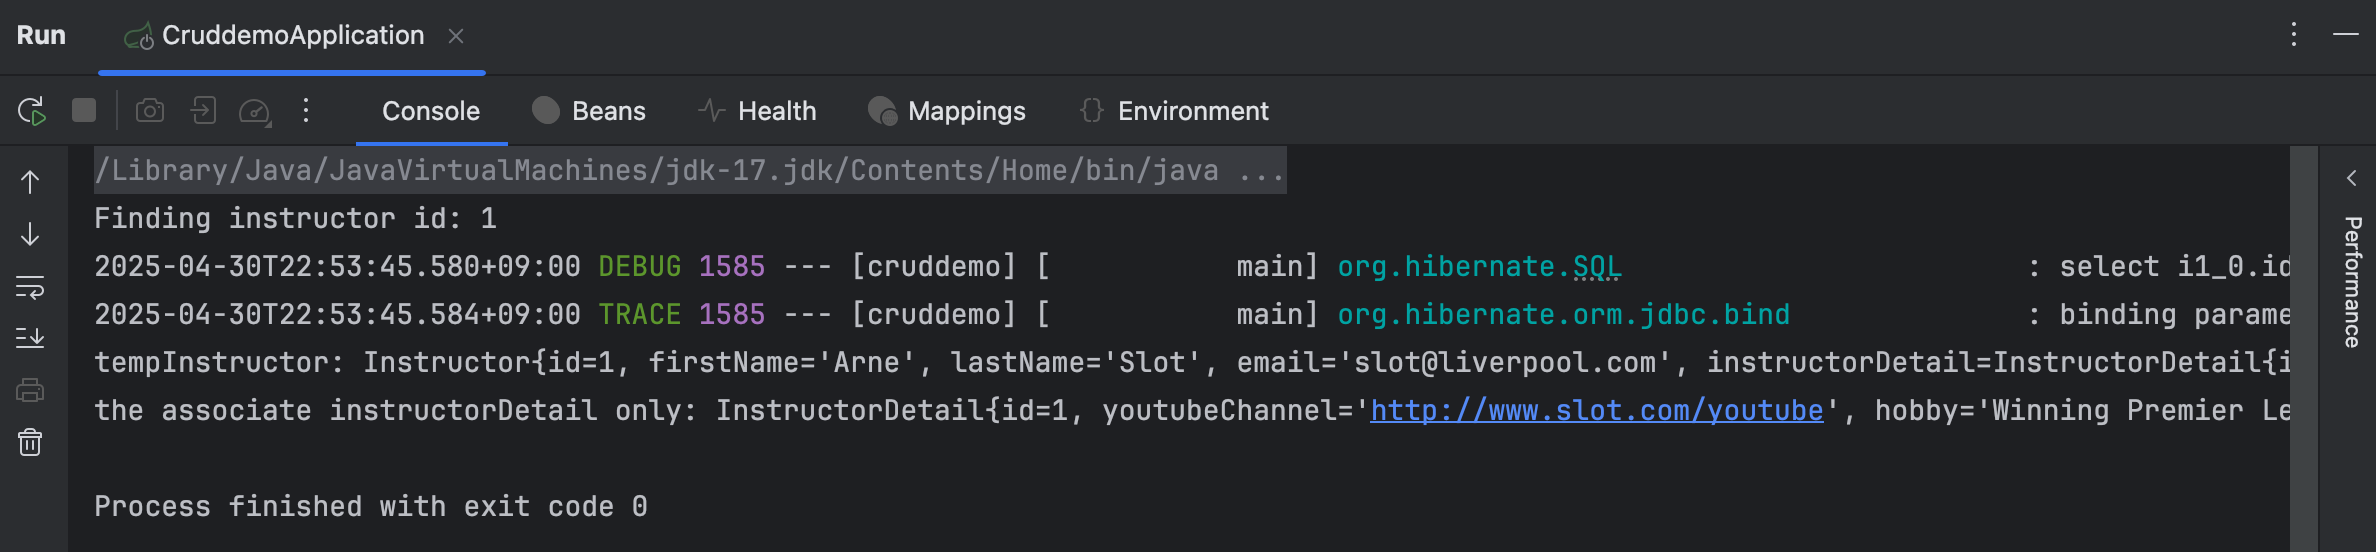
위와 같이 instructor 와 그의 detail 까지 모두 잘 조회한 것을 알 수 있다.
One-to-One Mapping Uni-Direction - Test (delete)
이번에는 instructor 를 삭제했을 때 detail 도 같이 삭제되는지 test 해보자.
@Override
@Transactional
public void deleteInstructorById(int theId) {
    Instructor tempInstructor = entityManager.find(Instructor.class, theId);
    entityManager.remove(tempInstructor);
}
위와 같이 AppDAOImpl 에 method 를 추가해주고, Main App 에 다음과 같이 추가한다.
private void deleteInstructor(AppDAO appDAO) {
    int theId = 1;
    System.out.println("Deleting instructor id: " + theId);

    appDAO.deleteInstructorById(theId);

    System.out.println("Done! :)");
}
Main App 에서는 DAO 를 inject 받아 사용하기 때문에 직접적으로 Database 에 접근하지 않고 DAO 를 통하여 손쉽게 DB 에 접근할 수 있다.

이후 test 를 해보면 위와 같이 instructor object 를 먼저 delete 한 이후, detail object 가 delete 된 것을 볼 수 있다.
이렇게 parent table 과 child table 에 대한 save, find, delete 작업을 알아봤다.
위에서 다룬 다양한 CasecadeType option 을 통하여 영속성 전이, 즉 cascading persistence 정도를 조절할 수 있다.